


Presenting your work is often the most critical part of the design process, yet it remains the most overlooked skill for many practitioners. You might have created a flawless interface, conducted rigorous user research, and iterated through dozens of prototypes. However, if you cannot articulate the value of your work, that effort may go unnoticed. Confidence in presentation is not about arrogance; it is about clarity, preparation, and a deep understanding of your own decisions.
In this guide, we explore the mechanics of showcasing your UX portfolio effectively. We will look at how to structure your narrative, handle feedback without defensiveness, and use visual aids to support your story. Whether you are stepping into an interview room or leading a stakeholder review, these strategies will help you communicate your impact with authority and precision.
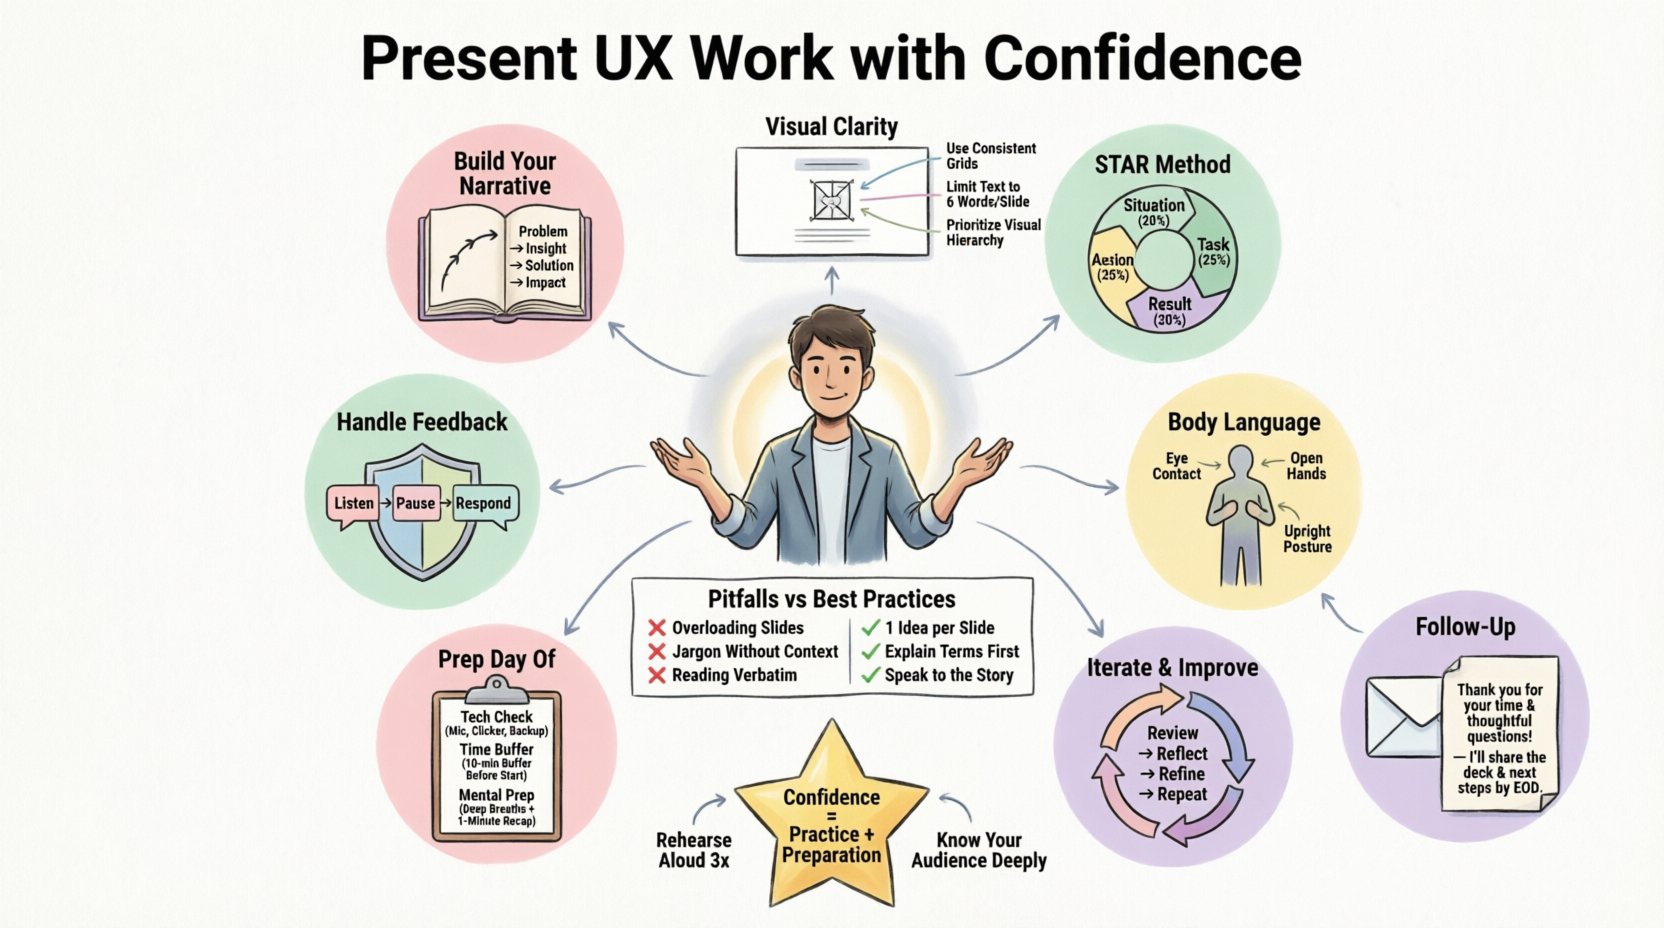
1. Building the Narrative Arc 📖
Design is storytelling. A case study is not just a collection of screenshots; it is a journey from a problem to a solution. When you present your work, you are guiding the listener through your thought process. A strong narrative keeps the audience engaged and helps them understand why certain decisions were made.
Setting the Context
Before showing any screens, establish the background. Who were you designing for? What was the business goal? What constraints did you face? Without this foundation, the audience cannot appreciate the solution.
- Identify the Stakeholder: Who was the problem for? Internal teams, external customers, or a specific demographic?
- Define the Goal: What did success look like? Increased conversion? Reduced support tickets? Improved accessibility?
- State the Constraints: Time, budget, technology, or regulatory requirements. Acknowledging limitations shows realism.
The Problem Statement
Clearly articulate the pain point. Avoid vague descriptions like “users were confused.” Be specific. “Users dropped off at the checkout stage because the form required unnecessary fields.” This specificity demonstrates that you understand the user experience deeply.
The Solution Journey
Show the path you took. Include failed attempts. Showing iteration proves that you do not rely on luck; you rely on testing and refinement. This builds trust in your process.
- Initial Concepts: Sketches or rough wireframes that explored different directions.
- Validation: Data or feedback that ruled out certain paths.
- The Final Design: The polished result that solved the problem.
2. Structuring Your Case Study 📐
A logical structure ensures your audience can follow your thinking. A disorganized presentation confuses the listener and dilutes your message. Use a standard framework that allows you to expand or contract based on the time available.
The STAR Method Adapted for UX
While often used in behavioral interviews, the STAR method (Situation, Task, Action, Result) works well for design presentations. Here is how to adapt it for UX:
| Component | What to Include | Time Allocation |
|---|---|---|
| Situation | Project background, team structure, and business goals. | 10% |
| Task | Your specific role and the challenges you needed to solve. | 15% |
| Action | Research methods, ideation, prototyping, and testing. | 45% |
| Result | Metrics, user feedback, and business impact. | 30% |
Focus on the “Why”
Many designers focus heavily on the “What” (the look) and the “How” (the tools). However, the “Why” is what separates a senior designer from a junior one. Every design decision should have a rationale.
- Don’t say: “I used this color because it looks nice.”
- Do say: “I selected this color because it aligns with our brand guidelines and provides sufficient contrast for accessibility standards.”
Highlighting Collaboration
Design is rarely a solo activity. Mention how you worked with developers, product managers, and researchers. This shows you are a team player who understands the broader product ecosystem.
- Research: “I synthesized findings from the qualitative interviews conducted by the research team.”
- Engineering: “I worked with the engineering lead to ensure the animations were feasible within the timeline.”
- Product: “We prioritized this feature based on the roadmap agreed upon with the product owner.”
3. Visual Presentation and Clarity 🖼️
Visuals support the spoken word. They should not distract from it. If your slides or portfolio are cluttered, the audience will struggle to find the key points. Use whitespace effectively to guide the eye.
Annotation is Key
A screenshot alone often tells a partial story. Add annotations to explain specific interactions or decisions. Use arrows, callouts, or text overlays to highlight the areas that matter most.
- Call out flows: Show how a user moves from point A to point B.
- Highlight changes: Use red lines or boxes to show what changed from the previous version.
- Explain micro-interactions: Describe what happens when a button is pressed or a menu is opened.
Mockups and Context
Place your designs in a realistic context. A screen floating in white space feels abstract. A phone mockup on a desk feels tangible. This helps stakeholders visualize the product in the real world.
- Device Frames: Use standard device frames to show responsiveness.
- Environment: Show how the app fits into a user’s daily life.
- Consistency: Ensure all mockups use the same lighting and style.
Avoiding Tool-Centric Language
Do not spend time explaining how you used specific software tools. The process matters more than the utility. Focus on the design thinking, not the interface of the design tool.
- Avoid: “I used the pen tool in the software to draw this shape.”
- Use: “I designed this shape to reduce cognitive load and improve scanability.”
4. Handling Feedback and Critique 🛡️
During interviews and reviews, you will face questions. Some will be friendly, others will be challenging. The goal is not to win an argument, but to demonstrate your ability to think critically under pressure.
Listen Fully
Do not interrupt. Let the questioner finish their thought. Interrupting signals defensiveness. Take a moment to process what was asked before responding.
Pause Before You Speak
A brief silence is powerful. It shows you are thinking about the answer, not just reacting. It also gives the audience time to absorb your previous point.
Defend with Evidence
If you disagree with a critique, do not dismiss it. Instead, refer back to your research or goals. Ground your argument in data.
- Response Strategy: “That is an interesting perspective. In our user testing, we found that users preferred the current layout because…”
- Alternative View: “I considered that option, but it conflicted with our accessibility goals. Here is how we balanced those needs.”
Admitting Limitations
If you do not know an answer, say so. It is better to be honest than to hallucinate. You can offer to follow up on the information later.
- Honest Response: “I did not have that specific data point at the time. I would need to review the analytics to give you a precise number.”
- Curiosity: “I haven’t explored that angle yet. How do you see that fitting into the current workflow?”
5. Non-Verbal Communication and Presence 🗣️
How you present is just as important as what you present. Your body language, tone, and energy convey confidence and professionalism.
Voice and Pace
Speak clearly and at a moderate pace. Nerves often make us speak too quickly. Slow down to emphasize key points. Vary your tone to keep the audience engaged.
- Volume: Ensure you are audible without shouting.
- Pacing: Pause after important statements to let them land.
- Clarity: Enunciate words, especially technical terms.
Eye Contact
Look at your audience. If presenting remotely, look at the camera, not the screen. This creates a connection. If presenting in person, scan the room to include everyone.
- Focus: Hold eye contact for 3-5 seconds per person.
- Scanning: Move your gaze naturally across the room.
- Screen: Glance at your notes or slides only when necessary.
Posture and Gestures
Stand or sit up straight. Slouching can signal disinterest or lack of confidence. Use hand gestures to emphasize points, but keep them contained within your torso area.
- Open Hands: Keep palms visible to signal openness.
- Stillness: Avoid fidgeting with pens or clicking pens.
- Movement: Shift weight or move slightly to show energy, but stay grounded.
6. Common Pitfalls and Best Practices ⚠️
To ensure you stay on track, compare common mistakes against recommended behaviors. This table serves as a quick reference guide for your preparation.
| Pitfall | Impact | Best Practice |
|---|---|---|
| Showing too many screens | Overwhelms the audience; dilutes the main story. | Select key moments: Show only 3-5 critical screens that tell the story. |
| Ignoring the business goal | Makes the work seem academic rather than practical. | Connect to metrics: Explicitly link design to business KPIs. |
| Being defensive | Creates tension and shuts down dialogue. | Be curious: Treat feedback as an opportunity to learn. |
| Reading from slides | Breaks eye contact; reduces engagement. | Speak naturally: Use slides as visual aids, not teleprompters. |
| Skipping the research | Undermines the validity of the solution. | Show the foundation: Briefly explain where insights came from. |
7. Preparing for the Day of the Presentation 📅
Confidence comes from preparation. Having a checklist ensures you have covered all bases before you start speaking.
Technical Check
Whether remote or in-person, verify your technology. Test your microphone, camera, and screen sharing capabilities beforehand. Have a backup plan if the internet fails.
- Internet: Have a tethered connection available.
- Files: Save your presentation locally in case of cloud sync issues.
- Links: Ensure all live links are working and not expired.
Time Management
Know the time limit and stick to it. If you have 30 minutes, aim for a 25-minute presentation to allow for Q&A. Practice with a timer to ensure you do not run over.
- Buffer: Leave 5 minutes for questions.
- Summary: Have a 1-minute summary ready if you are cut short.
- Deep Dive: Have extra slides ready if they ask for more detail.
Mental Preparation
Visualize the presentation going well. Imagine yourself speaking clearly and answering questions confidently. This mental rehearsal reduces anxiety.
- Focus on Value: Remind yourself of the value you bring to the team.
- Relax: Take deep breaths before starting.
- Be Yourself: Authenticity resonates more than a rehearsed persona.
8. Post-Presentation Follow-Up 📬
The presentation does not end when you stop speaking. Follow-up communication solidifies your professionalism and keeps the conversation going.
Send a Thank You Note
Send a brief email thanking the interviewers or reviewers for their time. Reiterate your interest in the role or project.
- Personalize: Mention a specific topic discussed during the presentation.
- Attach Materials: If you promised extra resources, include them now.
- Timing: Send within 24 hours.
Address Missed Points
If you realized you forgot to mention something important, or if you couldn’t answer a question, follow up with that information later. This shows dedication and thoroughness.
- Provide Data: Send the metrics you couldn’t recall on the spot.
- Clarify: Explain a concept more clearly if it was misunderstood.
- Offer Help: Ask if there is anything else they need from you.
9. Long-Term Growth and Iteration 🔄
Presenting is a skill that improves with practice. Treat every review as a learning opportunity. Reflect on what went well and what could be better.
Soliciting Feedback on Presentation
Ask trusted peers to critique your presentation style, not just your design. Ask them about your pacing, clarity, and body language.
- Peer Review: Conduct mock interviews with colleagues.
- Record Yourself: Watch your own recordings to spot nervous habits.
- Iterate: Update your case studies and narrative as you gain new experience.
Building a Personal Brand
Consistently presenting your work builds your reputation. Over time, you become known for clear thinking and effective communication. This leads to more opportunities and higher responsibility.
- Share Publicly: Publish case studies on your blog or portfolio site.
- Speak at Events: Offer to present at meetups or conferences.
- Mentor Others: Teaching others reinforces your own understanding.
10. Final Thoughts on Confidence 🌟
Confidence in presenting your work is a compound interest skill. It grows with every project, every interview, and every review. It is not about knowing everything; it is about being comfortable with not knowing and showing how you find answers.
Remember that your audience wants you to succeed. They are looking for someone who can solve problems and communicate ideas. By focusing on the user, the business, and the story, you naturally become a more compelling presenter.
Take these strategies and apply them to your next case study. Practice your narrative until it feels natural. Trust in your process and your expertise. When you speak with authority about the work you have done, you open doors that were previously closed.
Start preparing today. Your next opportunity depends on how well you can tell the story of your design.

